Difference between revisions of "Run your own virtual server"
| (35 intermediate revisions by 2 users not shown) | |||
| Line 1: | Line 1: | ||
| − | + | - '''NOTE: THE EASIEST WAY TO RUN YOUR OWN OBEY SERVER IS USING [https://nodecraft.com/r/obey NODECRAFT]: click on FREE trial.''' (After the trial, you can use the PROMO CODE "obey") | |
| − | + | ||
| − | Perfect... here's how! | + | - '''If you want to run a server from a computer in your house, the instructions for this can be found [[Run_your_own_server|HERE]].''' |
| + | |||
| + | - '''The page below will teach you how to run an OBEY server from virtual node on Digital Ocean (these instructions should also apply to others like AWS, etc.).''' | ||
| + | |||
| + | Are you a lazy bum that has no money? Me too! :D<br> | ||
| + | Did you know you can run a virtual OBEY server for about as much money as you find on a sidewalk ?<br><br> | ||
| + | |||
| + | Perfect... here's how!<br> | ||
| Line 10: | Line 16: | ||
You will need to register a credit card to start an account (this protects them from anyone running 100 servers 24/7 for no reason). | You will need to register a credit card to start an account (this protects them from anyone running 100 servers 24/7 for no reason). | ||
| + | '''In the billing section you can also put RUBYDROPLET to get $10 in credit''' (this can be done at any time, not just during registration). | ||
== Step 2) Create a new droplet. == | == Step 2) Create a new droplet. == | ||
[[File:VirtualServerHowTo1.jpeg]]<br> | [[File:VirtualServerHowTo1.jpeg]]<br> | ||
| − | - Select | + | - Select 2 CPU to make a nice multiplayer server. |
- Select a region closest to where you want the best ping to occur | - Select a region closest to where you want the best ping to occur | ||
| Line 21: | Line 28: | ||
- click "Create Droplet" | - click "Create Droplet" | ||
| − | |||
| − | |||
== Step 3) Set up the server == | == Step 3) Set up the server == | ||
| − | Go to Access Tab, and click on Console Access<br> | + | - Select your droplet (every droplet is a server).<br> |
| + | - Go to Access Tab, and click on Console Access<br> | ||
[[File:virtualServerHowTo2.jpg]]<br><br> | [[File:virtualServerHowTo2.jpg]]<br><br> | ||
| Line 43: | Line 49: | ||
<span style="color:#ccc">''and then log back in now as the user you just created (as will be good practice from now on)''</span> | <span style="color:#ccc">''and then log back in now as the user you just created (as will be good practice from now on)''</span> | ||
| − | '''mkdir | + | '''mkdir OBEY{{Current_Version}}''' <span style="color:#ccc">//let's make a folder in the new user's home dir to contain the build we want to use</span> |
| − | '''cd | + | '''cd OBEY{{Current_Version}}''' <span style="color:#ccc">//navigate to the directory</span> |
| − | '''wget <nowiki>http://www.obeygame.com/build/ | + | '''wget <nowiki>http://www.obeygame.com/build/_OBEY_latest_server.zip</nowiki>''' <span style="color:#ccc">//download OBEY into it</span> |
| − | '''unzip | + | '''unzip _OBEY_latest_server.zip''' <span style="color:#ccc">//and unzip it</span> |
| − | '''rm | + | '''rm _OBEY_latest_server.zip''' <span style="color:#ccc">//(optional) if you want to delete the zip we downloaded, we don't need it anymore</span> |
| − | <span style="color:#ccc">''Use nano text editor to configure your | + | <span style="color:#ccc">''Use nano text editor to configure your server settings...''</span> |
'''nano serverSettings.txt''' <span style="color:#ccc">//use ctrl + o (and press enter) to SAVE and ctrl + x to EXIT</span> | '''nano serverSettings.txt''' <span style="color:#ccc">//use ctrl + o (and press enter) to SAVE and ctrl + x to EXIT</span> | ||
| − | + | == Step 4) start a server == | |
| − | == start a server == | + | |
''Then, from the directory where you have unzipped the build...'' | ''Then, from the directory where you have unzipped the build...'' | ||
'''sh RUN_SERVER.sh''' | '''sh RUN_SERVER.sh''' | ||
| − | [[File:virtualServerHowTo4.jpg]] | + | [[File:virtualServerHowTo4.jpg]]<br> |
''When you see this screen your server is now running!'' | ''When you see this screen your server is now running!'' | ||
| Line 69: | Line 74: | ||
== HOW TO RUN SERVERS FOR MERE CENTS!!! == | == HOW TO RUN SERVERS FOR MERE CENTS!!! == | ||
| − | Now digitalocean.com charges us 3 cents an hour to run our server (running it constantly will come to $20 a month).<br> | + | Now digitalocean.com charges us 3 cents an hour to run our nice dual-processor server (running it constantly will come to $20 a month).<br> |
Every bunny knows that's a LOT of money (thats like 2 dropships!).<br><br> | Every bunny knows that's a LOT of money (thats like 2 dropships!).<br><br> | ||
So to keep costs ultra low we just run the server when we want it.<br> | So to keep costs ultra low we just run the server when we want it.<br> | ||
| − | digitalocean.com will charge us as long as we have a droplet (even if it's shut down), so we | + | digitalocean.com will charge us as long as we have a droplet (even if it's shut down), so to save money we delete our droplets when we don't want to be charged anything.<br> |
Now if we do that right now we will lose all our settings, so in order to not have to go through the setup again we create a snapshot. | Now if we do that right now we will lose all our settings, so in order to not have to go through the setup again we create a snapshot. | ||
'''logout'''<br> | '''logout'''<br> | ||
| − | '' | + | <span style="color:#ccc">''log back in as 'root'''...</span><br> |
| − | '''poweroff''' //shut down the server | + | '''poweroff''' <span style="color:#ccc">//shut down the server (droplet)</span> |
<center> | <center> | ||
| Line 88: | Line 93: | ||
[[File:virtualServerHowTo6.jpg]]<br><br> | [[File:virtualServerHowTo6.jpg]]<br><br> | ||
| − | When | + | When you want to start the server again start a new droplet, except this time use your snapshot!<br> |
[[File:virtualServerHowTo7.jpg]]<br> | [[File:virtualServerHowTo7.jpg]]<br> | ||
</center> | </center> | ||
| − | + | <span style="color:#ccc">''log in''</span><br> | |
| + | '''cd OBEY{{Current_Version}}''' <span style="color:#ccc">//Navigate to the location of OBEY</span><br> | ||
| + | '''sh RUN_SERVER.sh''' <span style="color:#ccc">//KILL BUNNIES</span> | ||
| − | + | You can even run more than one at once now (at 3 cents per hour) | |
| − | + | ||
| − | + | ||
| + | == How to send custom files to your remote server == | ||
| + | Now that you have your own server running... you might want to send custom maps or server settings to it. | ||
| + | There are various ways of doing it, here are the two easiest in my opinion: | ||
| + | '''With FTP''' | ||
| + | If you have a web hosting (ie you run a website), the easiest way is using FTP and using wget to get your files onto the server. | ||
| − | == TIPS | + | |
| + | '''Without FTP''' | ||
| + | |||
| + | Most people don't have access to a web server, so here is how to do it pretty easily. | ||
| + | |||
| + | 1) First step is to download [http://www.chiark.greenend.org.uk/~sgtatham/putty/download.html PuTTy], and use that to log into your droplet. | ||
| + | <center>To connect, simply '''type the IP of the droplet''' in the prompt and '''press Open'''. | ||
| + | [[File:virtualServerCustomFiles00.jpg]] | ||
| + | Then log in normally, and navigate to the folder where you want the file to go.</center> | ||
| + | |||
| + | 2) Go to [http://www.dropcanvas.com Dropcanvas.com] and drag your file into the page. | ||
| + | <center>[[File:virtualServerCustomFiles01.jpg]]</center> | ||
| + | |||
| + | |||
| + | 3) '''Right mouse click''' on the file and '''Copy Link Address''' or equivalent on your browser. | ||
| + | <center>[[File:virtualServerCustomFiles02.jpg]]</center> | ||
| + | |||
| + | 4) In Putty, type:<br> | ||
| + | '''wget (rmb to paste the link you copied) -O mapName.tmx''' <span style="color:#ccc">//(the -O is optional, but otherwise your file will have a strange name)</span> | ||
| + | |||
| + | |||
| + | |||
| + | |||
| + | |||
| + | == PRO-TIPS == | ||
if you make a mistake use the command '''rm''' to delete stuff. For example: | if you make a mistake use the command '''rm''' to delete stuff. For example: | ||
| − | '''rm fileName''' will delete fileName | + | '''rm fileName''' will delete fileName (rm = remove) |
'''<nowiki>rm -r someDir/*</nowiki>''' will delete everything inside someDir recursively (be careful!) | '''<nowiki>rm -r someDir/*</nowiki>''' will delete everything inside someDir recursively (be careful!) | ||
| − | '''pwd''' shows you where you are | + | '''pwd''' shows you where you are (pwd = present working directory) |
| − | '''ls''' shows you the contents of where you are | + | '''ls''' shows you the contents of where you are (ls = list) |
| − | + | '''cd someDir''' climbs into someDir (cd = change directory) | |
| − | ''' | + | '''cd ..''' climbs UP a directory level |
| + | '''mv from to''' move command can be used to move or rename files | ||
| − | You can add the new user to the 'super user' group so he can run admin tasks on the server instead of having to log in as root: | + | '''top''' will tell you performance and memory stats on what your server is up to. use Ctrl + C or Q to exit it. |
| + | |||
| + | - You can press TAB to auto-complete file and dir names | ||
| + | |||
| + | - You can press the up arrow to repeat the last command | ||
| + | |||
| + | - If you are on Windows, check out [http://www.chiark.greenend.org.uk/~sgtatham/putty/download.html PuTTy] to log in, it's better than using the interface on the website, because you can copy/paste and it won't use bandwidth. | ||
| + | |||
| + | - '''NOTE:''' if you get an error that looks like "OBEY.x86 not found" when you try to run the server, it means you are are running a 32bit app on a 64bit os or visa versa | ||
| + | |||
| + | - You can add the new user to the 'super user' group so he can run admin tasks on the server instead of having to log in as root: | ||
'''gpasswd -a userName sudo''' | '''gpasswd -a userName sudo''' | ||
| + | |||
| + | - If you want to close the terminal window but leave the server running, type the following: | ||
| + | |||
| + | '''press cntrl+z''' to escape the server state (which also pauses it) | ||
| + | |||
| + | '''bg''' will send the server to the background (unpausing it) | ||
| + | |||
| + | '''disown''' stop attaching it to you | ||
| + | |||
| + | '''exit''' exit the window and the server will run on.. :) | ||
| + | |||
| + | - If you want to kill a running server that you have previously disowned, use '''top''' to lists existing jobs then '''kill #''' to kill the job with the given job id number | ||
| + | |||
| + | == Security == | ||
| + | If you are planning on running the server for long periods of time without frequently reverting back to a fresh droplet, consider adding port security. [http://www.howtogeek.com/177621/the-beginners-guide-to-iptables-the-linux-firewall/ Iptables is recommended]. (If anyone can expand this section with a step by step guide for securing the appropriate ports that would be helpful) | ||
Latest revision as of 16:17, 15 May 2020
- NOTE: THE EASIEST WAY TO RUN YOUR OWN OBEY SERVER IS USING NODECRAFT: click on FREE trial. (After the trial, you can use the PROMO CODE "obey")
- If you want to run a server from a computer in your house, the instructions for this can be found HERE.
- The page below will teach you how to run an OBEY server from virtual node on Digital Ocean (these instructions should also apply to others like AWS, etc.).
Are you a lazy bum that has no money? Me too! :D
Did you know you can run a virtual OBEY server for about as much money as you find on a sidewalk ?
Perfect... here's how!
Contents
Step 1) Register on a service
Make an account on DigitalOcean.com <-- follow this link to register, you will start with $10 in credit!
You will need to register a credit card to start an account (this protects them from anyone running 100 servers 24/7 for no reason).
In the billing section you can also put RUBYDROPLET to get $10 in credit (this can be done at any time, not just during registration).
Step 2) Create a new droplet.
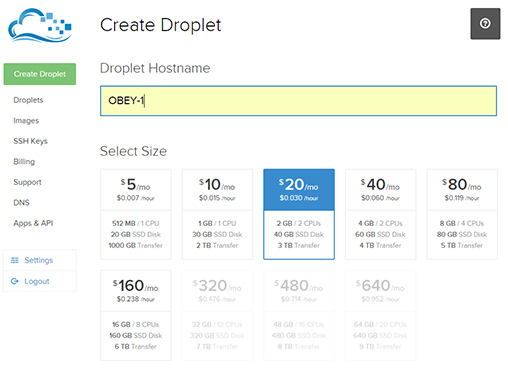
- Select 2 CPU to make a nice multiplayer server.
- Select a region closest to where you want the best ping to occur
- Select Ubuntu (other distros probably work just fine too, but I haven't tested them)
- click "Create Droplet"
Step 3) Set up the server
- Select your droplet (every droplet is a server).
- Go to Access Tab, and click on Console Access
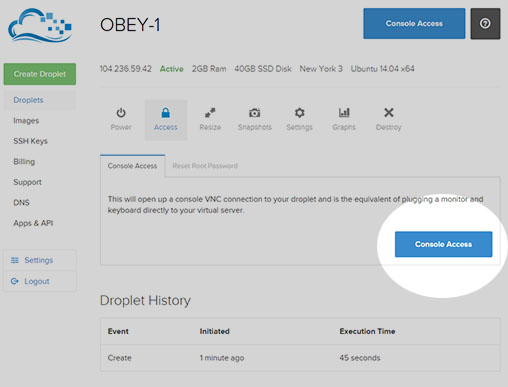
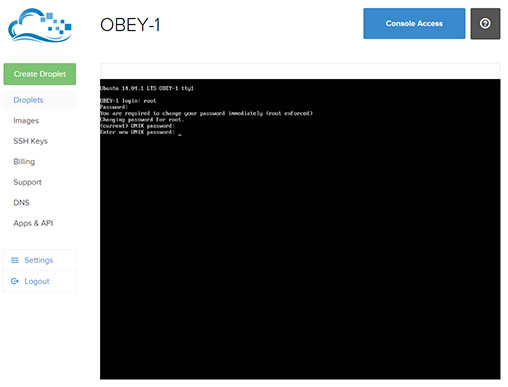
- When you see the black screen type root as a username and press enter
- Then check your email to type the password you should have received in the mail.
- Enter it and set a new one as prompted.
sudo apt-get install unzip //install zip/unzip functionality with this
adduser userName //make a new user (not good practice to do everything as root).
it will ask you for details about the user, but you can leave the options blank by pressing <enter>. Then...
logout
and then log back in now as the user you just created (as will be good practice from now on)
mkdir OBEY102r2 //let's make a folder in the new user's home dir to contain the build we want to use
cd OBEY102r2 //navigate to the directory
wget http://www.obeygame.com/build/_OBEY_latest_server.zip //download OBEY into it
unzip _OBEY_latest_server.zip //and unzip it
rm _OBEY_latest_server.zip //(optional) if you want to delete the zip we downloaded, we don't need it anymore
Use nano text editor to configure your server settings...
nano serverSettings.txt //use ctrl + o (and press enter) to SAVE and ctrl + x to EXIT
Step 4) start a server
Then, from the directory where you have unzipped the build...
sh RUN_SERVER.sh
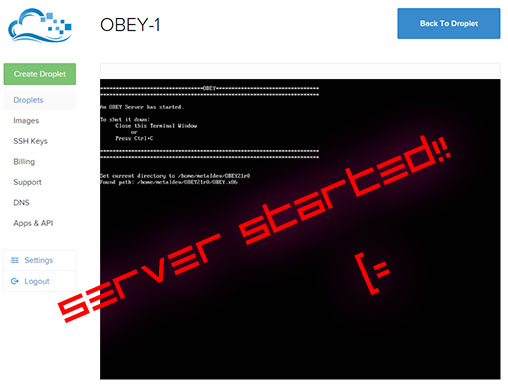
When you see this screen your server is now running!
HOW TO RUN SERVERS FOR MERE CENTS!!!
Now digitalocean.com charges us 3 cents an hour to run our nice dual-processor server (running it constantly will come to $20 a month).
Every bunny knows that's a LOT of money (thats like 2 dropships!).
So to keep costs ultra low we just run the server when we want it.
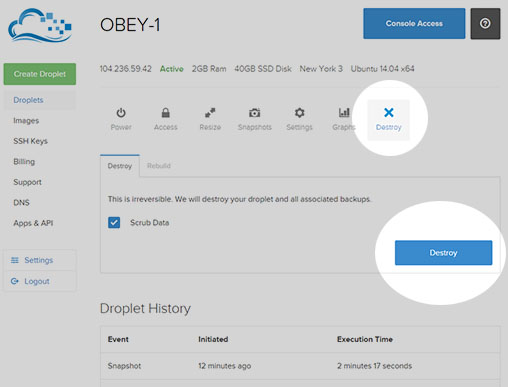
digitalocean.com will charge us as long as we have a droplet (even if it's shut down), so to save money we delete our droplets when we don't want to be charged anything.
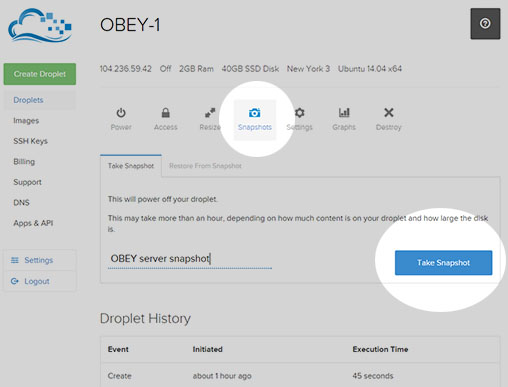
Now if we do that right now we will lose all our settings, so in order to not have to go through the setup again we create a snapshot.
logout
log back in as 'root'...
poweroff //shut down the server (droplet)
Then save a snapshot as shown (name it whatever you want)
...it might take 1 or 2 minutes to save.
Then we can delete our droplet to not be charged any cents!
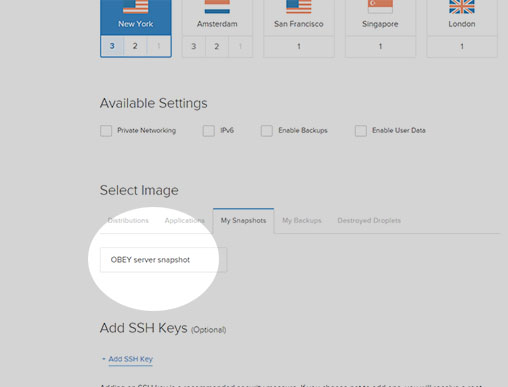
When you want to start the server again start a new droplet, except this time use your snapshot!
log in
cd OBEY102r2 //Navigate to the location of OBEY
sh RUN_SERVER.sh //KILL BUNNIES
You can even run more than one at once now (at 3 cents per hour)
How to send custom files to your remote server
Now that you have your own server running... you might want to send custom maps or server settings to it. There are various ways of doing it, here are the two easiest in my opinion:
With FTP
If you have a web hosting (ie you run a website), the easiest way is using FTP and using wget to get your files onto the server.
Without FTP
Most people don't have access to a web server, so here is how to do it pretty easily.
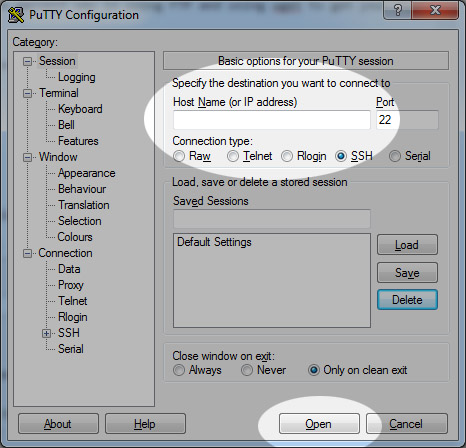
1) First step is to download PuTTy, and use that to log into your droplet.
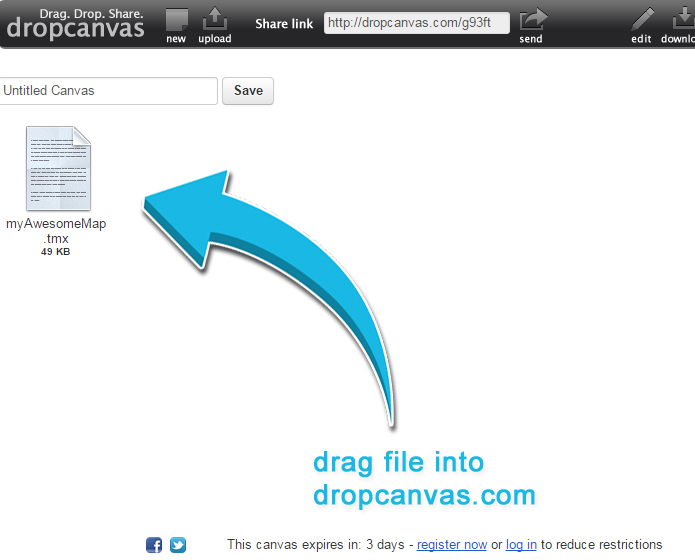
2) Go to Dropcanvas.com and drag your file into the page.
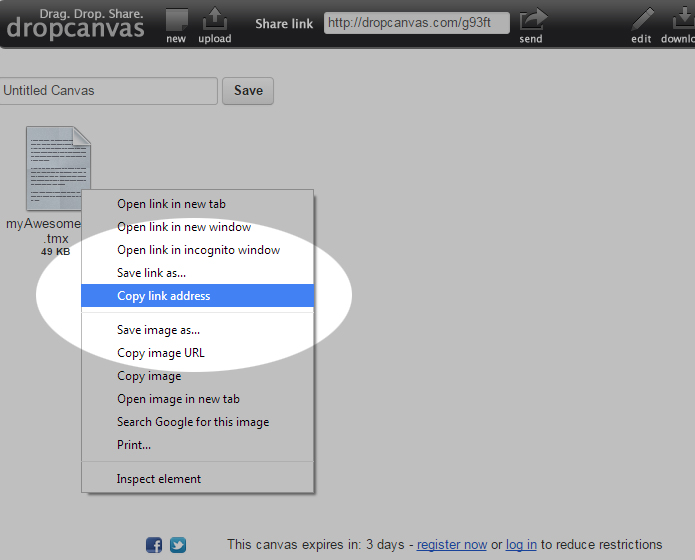
3) Right mouse click on the file and Copy Link Address or equivalent on your browser.
4) In Putty, type:
wget (rmb to paste the link you copied) -O mapName.tmx //(the -O is optional, but otherwise your file will have a strange name)
PRO-TIPS
if you make a mistake use the command rm to delete stuff. For example:
rm fileName will delete fileName (rm = remove)
rm -r someDir/* will delete everything inside someDir recursively (be careful!)
pwd shows you where you are (pwd = present working directory)
ls shows you the contents of where you are (ls = list)
cd someDir climbs into someDir (cd = change directory)
cd .. climbs UP a directory level
mv from to move command can be used to move or rename files
top will tell you performance and memory stats on what your server is up to. use Ctrl + C or Q to exit it.
- You can press TAB to auto-complete file and dir names
- You can press the up arrow to repeat the last command
- If you are on Windows, check out PuTTy to log in, it's better than using the interface on the website, because you can copy/paste and it won't use bandwidth.
- NOTE: if you get an error that looks like "OBEY.x86 not found" when you try to run the server, it means you are are running a 32bit app on a 64bit os or visa versa
- You can add the new user to the 'super user' group so he can run admin tasks on the server instead of having to log in as root:
gpasswd -a userName sudo
- If you want to close the terminal window but leave the server running, type the following:
press cntrl+z to escape the server state (which also pauses it)
bg will send the server to the background (unpausing it)
disown stop attaching it to you
exit exit the window and the server will run on.. :)
- If you want to kill a running server that you have previously disowned, use top to lists existing jobs then kill # to kill the job with the given job id number
Security
If you are planning on running the server for long periods of time without frequently reverting back to a fresh droplet, consider adding port security. Iptables is recommended. (If anyone can expand this section with a step by step guide for securing the appropriate ports that would be helpful)
